Hello beautifuls!
So I've been wearing sheet masks a lot more frequently than I used to, simply because my face is recovering from breaking out, I need MAXIMUM whitening possible! For me, using whitening products is not about trying to get paler, but to help reduce scarring and hyperpigmentation.
Super easy and basic video. But somehow a lot of ppl don't usually think about doing?
If you already know this trick, sorry if it wasted your time XD just see it as a super sexy video of me where you can see me wearing sheet masks, fair fair? ... no? XD haha. I hope it helped some of you.
Happy wearing sheet masks! ^_~ Okay now I'm really off to bed... gonna sleep and sleep and sleeeeep... zzzZZzzZZzzZZZZZzzzzzzZZZZzzzzzzzzzzzzzzzzz
<3 Frances
About Me

- Frances
- California, United States
- Hi! Thanks for visiting ^_^ My social media platforms: Instagram: meowmier Youtube: http://goo.gl/U5SnNM (formerly under the username francesvlogs but I don't have access to that anymore). I don't really do videos anymore simply because I think blog posts are more informative. Hope you enjoyed your time here! :)
Showing posts with label tips. Show all posts
Showing posts with label tips. Show all posts
Saturday, June 18, 2011
Tuesday, July 6, 2010
Eyeliner Basics for Asian Eyes/ How I Do MY Eyeliner
Hello~~~~~~~~
Sorry long time no post!!! Been busy ahhh X___X
So today's post is gonna be super eyeliner basics... specifically for Asians with closed lid space, like me :D
So you can skip this post if you don't need this information.
But firstttt....
I'd like to talk about different types of eyelids. Because I found that none of my white/non-Asian friends understand what I'm talking about when was describing how there are outwardly-folded (外雙)/ inwardly-folded (內雙) eyes, monolids, even open-eye (開眼頭) surgery.
Here are some example pictures of non-Asians eyelids just so you guys can see the differences:
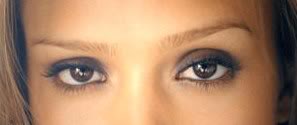
Jessica Alba
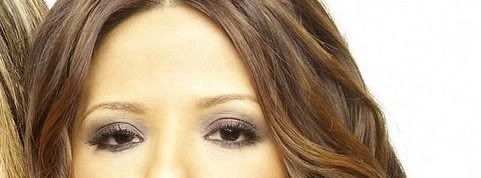
Natalie/Girlicious
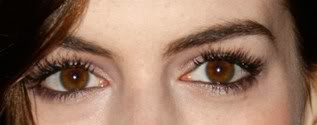
Anne Hathaway
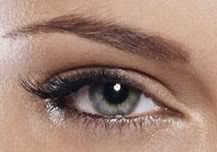
Angelina Jolie
I feel like for non-Asians they're more like a crease, rather than an actually fold
Now onto Asian eyes :)
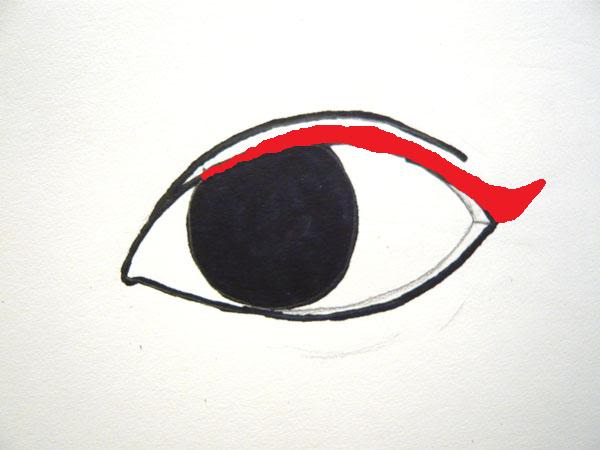
There are roughly four types of Asian eyelids (monolid not included in this picture)

My very crappy drawing XD
1.
Outwardly folded eye with open inner tear duct
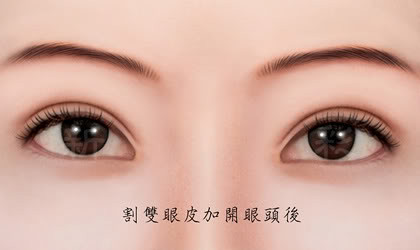

I don't see this eye shape a lot for Asians (and may I specify East Asians) but I have met a few ppl who naturally have this kind of eye shape.
There are eyelid surgeries available where the inner corner of the skin of the eyelid/skin right on top of the inner tear duct is removed to open up the eyes, known as open-eye surgery; 開眼頭).
2.
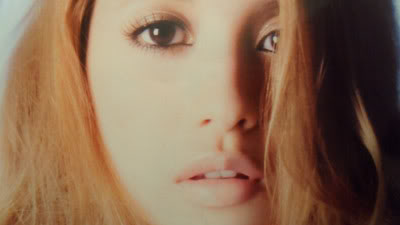
Outwardly-folded eye (外雙)
Representation: Ayumi Hamasaki!
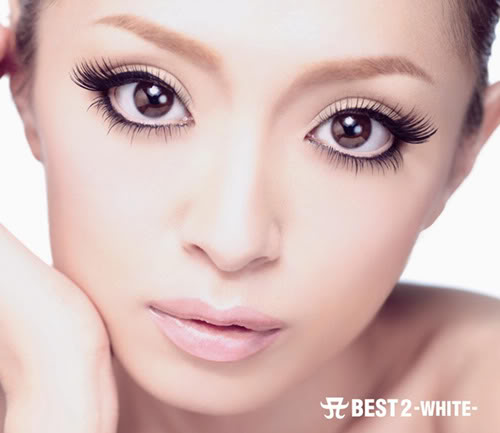
Where the inner corner of the fold doesn't really connect with the inner corner of the eye
3.
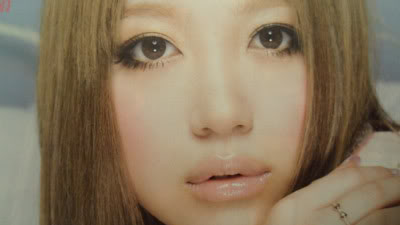
Inwardly-folded eye (內雙)
Representation: BoA!
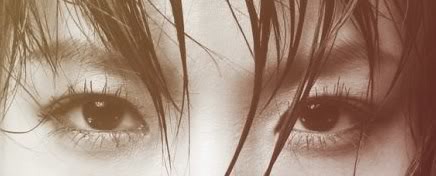
Where the inner corner of the fold actually is connected to the inner corner of the eye
Hahaha yayy BoA represent!!! cuz... I have this eye shape too XD
Lastly would be monolid... which I'm not gonna talk about cuz most ppl know what it is. It's just the way Asian lids fold differently is very perplexing to a lot of ppl :P
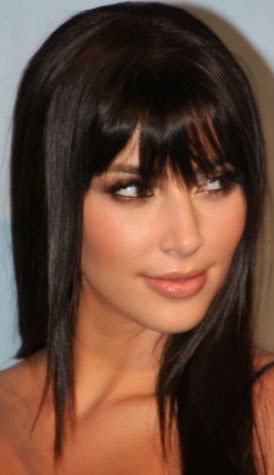
To demonstrate my point better:
For eye shape #1 and 2... you can pretty much do whatever you want with your eyeliner, there's not many limitations thanks to the lid space there is. I'm gonna talk about today is how eye shape #3 should do their eyeliner, or my suggestion at least :) there is no rule and it really depends on your personal style/taste as well.
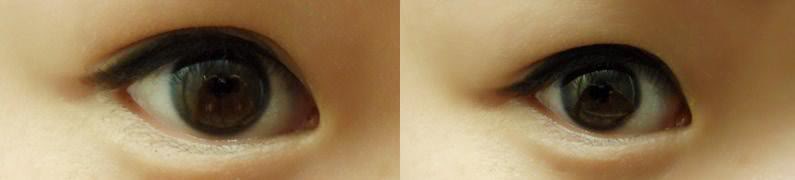
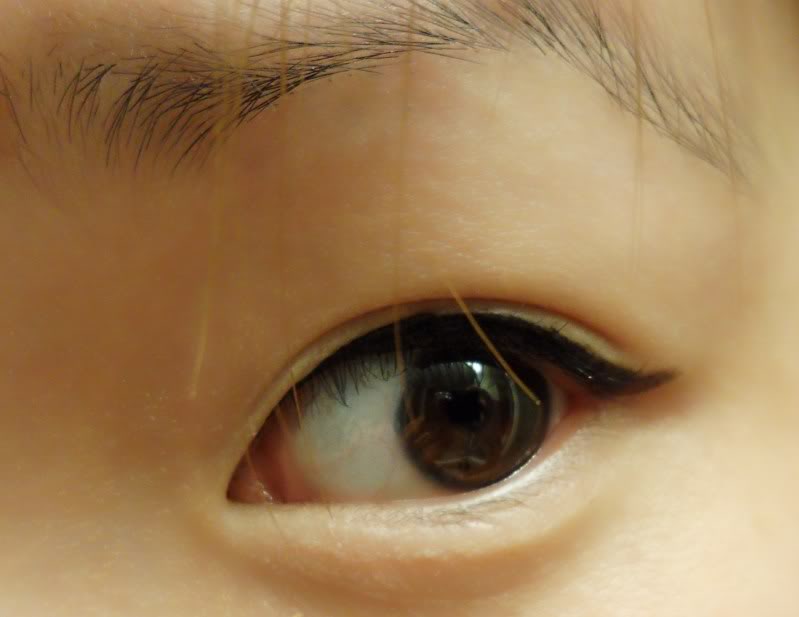
So first off, I always tight-line my upper lash line
Second part, lining your upper liner, is the trickier part.
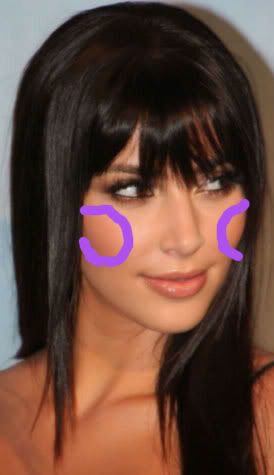
Because of the nature of this lid, the inner corner of the eye is closed up, leaving no lid space, so I'd advise you to start lining your eyes where your pupil is when you look straight at the mirror
see how I don't start at the very inner corner?
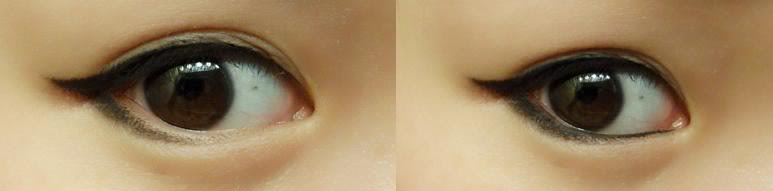
And here's a comparison between you leaving in inner corner free (left) and gradually thickening the eyeliner out , versus if you fill in the inner corner with the eyeliner with same thickness from inner corner to outer corner (right).
See how on the right, the eyeliner basically fills in your lid space and closes your eyes down? This should be avoided.
Wing out your eyes if you want (or you can save this step along with lining bottom lash line)
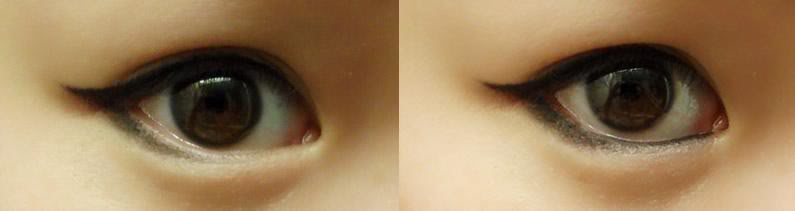
Now onto the bottom liner
Line only 2/3 way in, and start fading the gel liner as you work inward
Leaving the inner corner free makes your eyes appear bigger and brighter
Whereas lining the whole bottom line kind of closes your eye, because you're defining the boundaries of your eye area.
The above is just my suggestion if you want to achieve bigger/brighter eyes :) But of course you can do whatever you like. It really depends on what kind of look you're trying to achieve. For me this is how I do my eyeliner on a daily basis.
Now, I'm gonna show how to do the same thing using a liquid eyeliner.
For the upper liner, follow the same procedure of lining
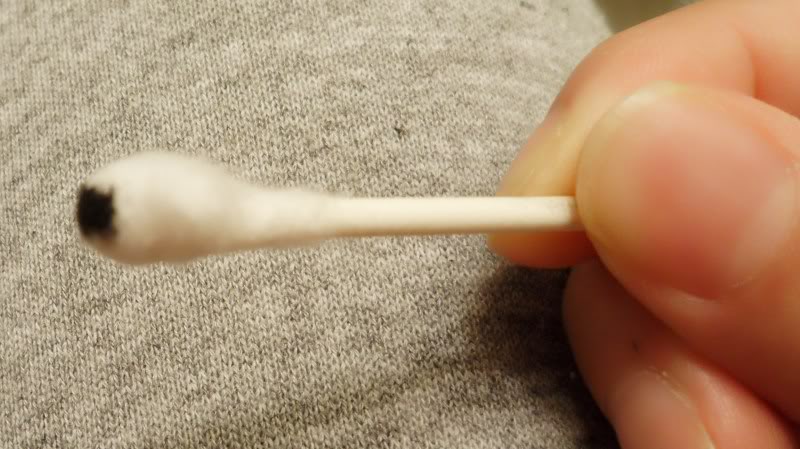
Now onto the bottom liner, have a Q-tip ready.
Dip the tip on the Q-tip into black/brown eye shadow, then blow at it gently to remove the excess eye shadow so you won't have fall-outs
Then roughly place your liquid liner
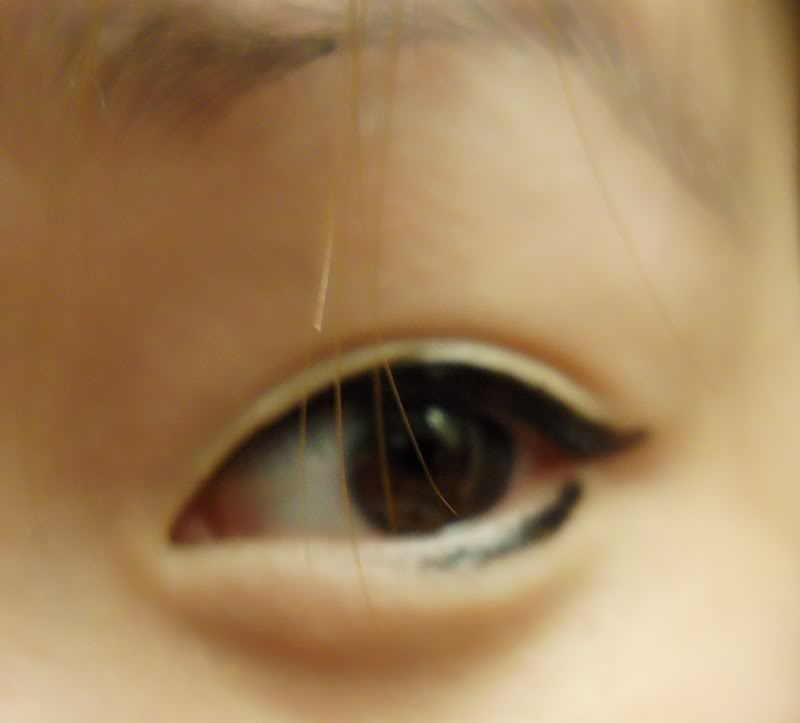
(Sorry for the blurry pic cuz I had to do it fast haha)
And WHILE THE LIQUID EYELINER IS STILL WET, with DABBING motion, gently dab the eye shadow onto the liquid liner. I usually just dab at 3 points

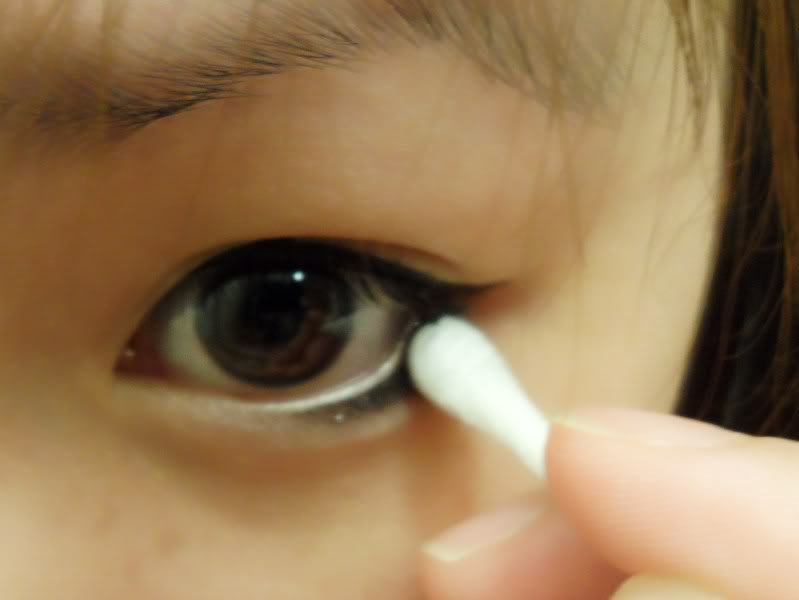
Like so (I took the pics after I finished dabbing lol here's just to show where to dab)
End result... tah-dah!
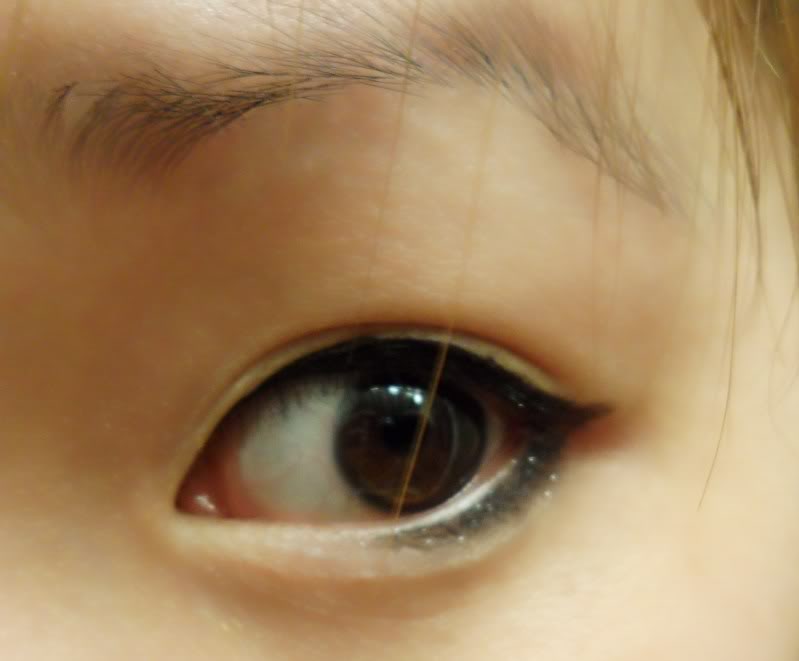
Pretty natural eh?
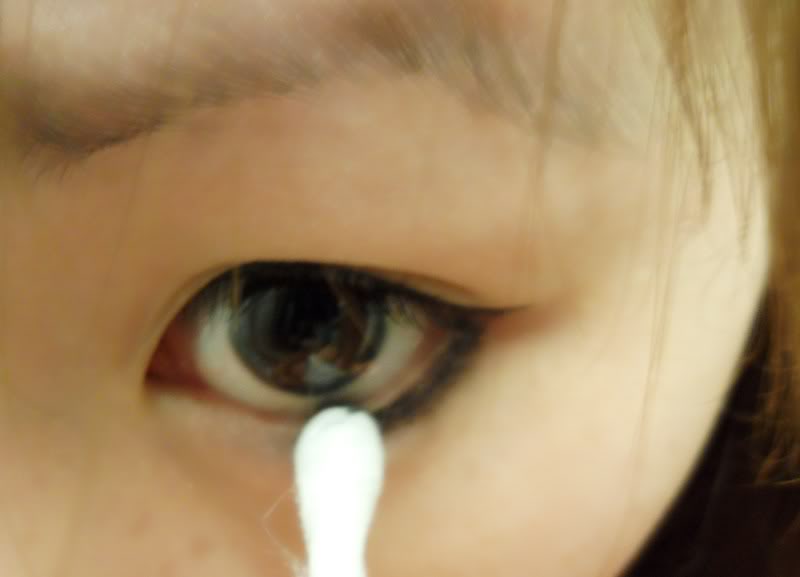
SECOND OPTION with liquid liner
You can also use a wet Q-tip and smudge out the liquid liner while it's still wet, it will give you the same effect. However I found this method gives less consistent results because it really depends on the formular of the liquid liner; For examples, this method works on Revlon, Maybelline and Tokidoki liquid liner, but NOT on loreal. I found if I use this method with loreal liquid liner it'd just wipe the liner away.
So that's all... very very basic stuff. But I hope some of you might find it useful :)
Thanks for reading I know it's super long!
<3 Frances
--------------------------------------------------------------------------------------------------------------------------
Okay I must have sucked at explaining the differences between eye shape #1 and 2 and my drawing must have sucked XD
Anyways a bloggie asked about what the difference is ^^~
So I found some better pictures to explain
Both #1 and #2 are outwardly-folded lids. The only difference is that #1 has also removed the eyelid on the inner corner.
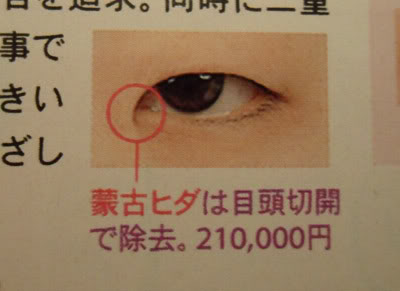
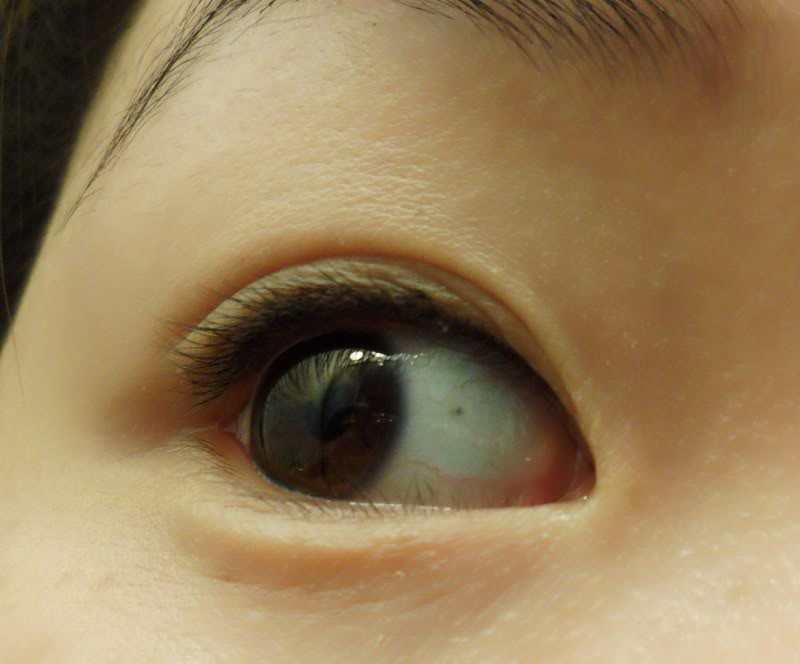
I got this off a eye surgery advertisement page. The circled part indicates the skin that is to be removed.
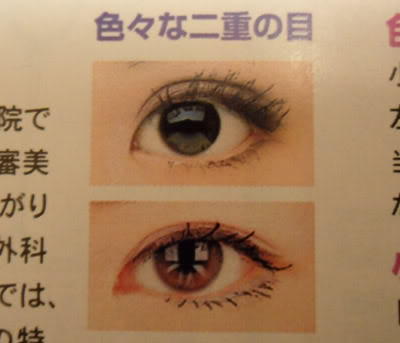
So here are the two eye shapes I was talking about, #1 being the bottom eye, #2 being the top eye. You can clearly see the tear duct of the bottom eye because the part of the skin that covers it has been removed.
Other example of #1 eye:
#2
you can see the skin of the inner corner of her eye is still intact, unlike the model above.
***** I'm not saying these models have had surgeries done! I have no knowledge about that.
*****I DO NOT OWN ALL OF THE IMAGES
Hope that clears things up :) <3 Frances
Sorry long time no post!!! Been busy ahhh X___X
So today's post is gonna be super eyeliner basics... specifically for Asians with closed lid space, like me :D
So you can skip this post if you don't need this information.
But firstttt....
I'd like to talk about different types of eyelids. Because I found that none of my white/non-Asian friends understand what I'm talking about when was describing how there are outwardly-folded (外雙)/ inwardly-folded (內雙) eyes, monolids, even open-eye (開眼頭) surgery.
Here are some example pictures of non-Asians eyelids just so you guys can see the differences:
Jessica Alba
Natalie/Girlicious
Anne Hathaway
Angelina Jolie
I feel like for non-Asians they're more like a crease, rather than an actually fold
Now onto Asian eyes :)
There are roughly four types of Asian eyelids (monolid not included in this picture)
My very crappy drawing XD
1.
Outwardly folded eye with open inner tear duct
I don't see this eye shape a lot for Asians (and may I specify East Asians) but I have met a few ppl who naturally have this kind of eye shape.
There are eyelid surgeries available where the inner corner of the skin of the eyelid/skin right on top of the inner tear duct is removed to open up the eyes, known as open-eye surgery; 開眼頭).
2.
Outwardly-folded eye (外雙)
Representation: Ayumi Hamasaki!
Where the inner corner of the fold doesn't really connect with the inner corner of the eye
3.
Inwardly-folded eye (內雙)
Representation: BoA!
Where the inner corner of the fold actually is connected to the inner corner of the eye
Hahaha yayy BoA represent!!! cuz... I have this eye shape too XD
Lastly would be monolid... which I'm not gonna talk about cuz most ppl know what it is. It's just the way Asian lids fold differently is very perplexing to a lot of ppl :P
To demonstrate my point better:
For eye shape #1 and 2... you can pretty much do whatever you want with your eyeliner, there's not many limitations thanks to the lid space there is. I'm gonna talk about today is how eye shape #3 should do their eyeliner, or my suggestion at least :) there is no rule and it really depends on your personal style/taste as well.
So first off, I always tight-line my upper lash line
Second part, lining your upper liner, is the trickier part.
Because of the nature of this lid, the inner corner of the eye is closed up, leaving no lid space, so I'd advise you to start lining your eyes where your pupil is when you look straight at the mirror
see how I don't start at the very inner corner?
And here's a comparison between you leaving in inner corner free (left) and gradually thickening the eyeliner out , versus if you fill in the inner corner with the eyeliner with same thickness from inner corner to outer corner (right).
See how on the right, the eyeliner basically fills in your lid space and closes your eyes down? This should be avoided.
Wing out your eyes if you want (or you can save this step along with lining bottom lash line)
Now onto the bottom liner
Line only 2/3 way in, and start fading the gel liner as you work inward
Leaving the inner corner free makes your eyes appear bigger and brighter
Whereas lining the whole bottom line kind of closes your eye, because you're defining the boundaries of your eye area.
The above is just my suggestion if you want to achieve bigger/brighter eyes :) But of course you can do whatever you like. It really depends on what kind of look you're trying to achieve. For me this is how I do my eyeliner on a daily basis.
Now, I'm gonna show how to do the same thing using a liquid eyeliner.
For the upper liner, follow the same procedure of lining
Now onto the bottom liner, have a Q-tip ready.
Dip the tip on the Q-tip into black/brown eye shadow, then blow at it gently to remove the excess eye shadow so you won't have fall-outs
Then roughly place your liquid liner
(Sorry for the blurry pic cuz I had to do it fast haha)
And WHILE THE LIQUID EYELINER IS STILL WET, with DABBING motion, gently dab the eye shadow onto the liquid liner. I usually just dab at 3 points
Like so (I took the pics after I finished dabbing lol here's just to show where to dab)
End result... tah-dah!
Pretty natural eh?
SECOND OPTION with liquid liner
You can also use a wet Q-tip and smudge out the liquid liner while it's still wet, it will give you the same effect. However I found this method gives less consistent results because it really depends on the formular of the liquid liner; For examples, this method works on Revlon, Maybelline and Tokidoki liquid liner, but NOT on loreal. I found if I use this method with loreal liquid liner it'd just wipe the liner away.
So that's all... very very basic stuff. But I hope some of you might find it useful :)
Thanks for reading I know it's super long!
<3 Frances
--------------------------------------------------------------------------------------------------------------------------
Okay I must have sucked at explaining the differences between eye shape #1 and 2 and my drawing must have sucked XD
Anyways a bloggie asked about what the difference is ^^~
So I found some better pictures to explain
Both #1 and #2 are outwardly-folded lids. The only difference is that #1 has also removed the eyelid on the inner corner.
I got this off a eye surgery advertisement page. The circled part indicates the skin that is to be removed.
So here are the two eye shapes I was talking about, #1 being the bottom eye, #2 being the top eye. You can clearly see the tear duct of the bottom eye because the part of the skin that covers it has been removed.
Other example of #1 eye:
#2
you can see the skin of the inner corner of her eye is still intact, unlike the model above.
***** I'm not saying these models have had surgeries done! I have no knowledge about that.
*****I DO NOT OWN ALL OF THE IMAGES
Hope that clears things up :) <3 Frances
Tuesday, June 29, 2010
Foundation Application
Hi there!
So I sum up a few ways you can apply your foundation... hopefully this will help you choose the perfect method for the perfect look :)
I'm starting to do the highlighting thing for people who don't want to read everything :) hopefully it'll make the reading process easier XD
1. Wedged sponges
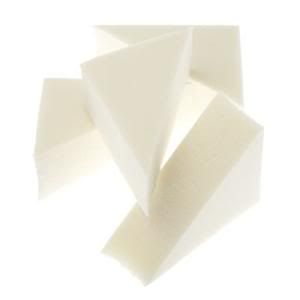
** Always wet your sponges before you use them!!
Pros: This application gives you very even and natural coverage, and the wedges allow you to get into everywhere on your face :) a very friendly application, I recommend beginners to start out with sponges because you can't really go wrong with them, and they're super cheap :)
Cons: Not very eco-friendly obviously... because you just throw them away after application. You guys might think I'm crazy but I think it is something to be considered. Secondly, sponges absorb too much product. Although you already wet them to prevent them from absorbing too much, they still eat up a lot of the product.
2. Foundation brush

Pros: I think this application "waste" the least product, because foundation brushes don't absorb much product. And if you have a good foundation brush, the application will be very even and natural as well. However, if you don't have a good foundation brush, it's very likely that you'll have streak marks on you (A good foundation brush in my opinion has to be thick, because it needs to have enough fine hairs to get every inch of your face, leaving no space between streaks. In other words, if you're looking at a very thin foundation brush, it is likely to leave streak marks. Also having very fine and soft bristles is very important too cuz that will reduct the streakiness. A good foundation brush I've used is from Sephora professional line). It is important to do some homework on foundation brushes before you randomly buy one because they're pretty expensive, you don't want to burn a hole in your pocket. However, I feel like foundation brushes are only good for using moist foundation (preferably watery ones) ; if the foundation is relatively dry, it is a little hard to work with. But you can always wet your foundation brush if your foundation is too dry to work with, that'll help :)
Cons: Streak marks.
3. Stippling brush

Pros: You can get the so-called the air-brushed effect by stippling foundation on... or that's what they say. To be honest with you guys, I can't tell the difference XD but thought I'd just throw it out there, in case you guys actually notice a difference.
Cons: You need more time and patience for this method, since it could take a while to stipple your whole face (since I'm so lazy... not my favorite to apply foundation XD haha). Also, I would highly suggest buying a smaller stippling brush, like for example, a size like MAC 130 or 188 (Not saying you should buy MAC! Just giving you an idea of the size of the brush, although MAC stippling brushes are better than the Sephora ones in my opinion-- they're softer). I have a MAC 187, and I found that when I'm applying my nose area, the big stippling brush just cannot get into the smaller corners, thus leaving a very uneven application-- I always have to use my fingers to blend it out. So I recommend getting a smaller stippling brush if you're thinking about buying one :)
4. Last but not least... your fingers of course lol!
Pros: Your fingers can warm up the foundation, thus is very good for blending.
Cons: Applying foundation using fingers is more heavy. This is not a bad thing if you want a good coverage. I don't normally like heavy coverage so I prefer using sponges or foundation brushes. However, if I want to use foundation to conceal, I love using my fingers.
*** You can also put the foundation on the back of your hand, and use one or two fingers to rub on the foundation in circular motion on the back of your for a little bit, then use the foundation on your fingers for a lighter application :)
And I think that's it! Did I leave out anything!?!?!?!?????!?!?????!?!?!?????? I hope not lol!
Hope this is helpful :D
Makeup brushes are pretty expensive... so if you can't afford them, I'd say just go ahead and try out the sponges, cuz I think they work wonderfully :)
<3 Frances
Wednesday, June 16, 2010
Touching up on cakey makeup
Hi hi hi everybody =) I hope everyone's enjoying summer like I am :)
Because it's summer~ so it's time to get oily XD So today's entry is gonna be on how to touch up on cakey makeup :)
I'm gonna focus on the nose area cuz that's the only place I get oily and the foundation/powder on my nose sort of cakes up/looks shinier like it's soaked with oil =_= (haha I'm exaggerating but you know what I mean right?! like the matte finish is gone that kind of thing)
So things you SHOULD'NT do (please don't lol! Speaking from my own experience here HAHA)
1. DO NOT just lay another layer of liquid or powder foundation! It's gonna look super thick and will clump!
2. DO NOT just take your mattifying powder and pat it on/brush it on what have you. It WILL clump I promise you! BIG NONO *wags finger*
I want to share my little horrific experience of doing #2 XD... so I have this Laura Mercier/Smooth Focus Pressed Setting Powder - Shine Control. So on Sephora, it says:
Laura Mercier Smooth Focus Pressed Setting Powder - Shine Control is a lightweight, oil-free powder that visibly eliminates shine and produces a fresh, matte complexion. The naturally derived Shine Control Complex controls oil breakthrough and the ultra-sheer, mint green shade works to correct redness and visibly even out the skintone. It's ideal for touch-ups throughout the day as it keeps your complexion flawless and shine-free.
Okay the highlighted part-- it made it sound like you can just take the powder and press it on then it's gonna blot the oil/mattify your skin. oh, HELL NOOOOOOOOOOOOOOOOOOOO!!! I did it and it totally clumped on me!!! AGHHH!!!! good thing that I was at home when I was trying to mattify my nose... cuz I was oh sh*ttttttttttttt!!!!! sh*t sh*t SH*T!!! So I ended up removing the whole thing and redid my makeup =_= (I assume MAC blot powder is the same?????? Never used it though so I don't know.. but it seems like other gurus just grab the blotting powder and put them on themselves... I wonder how they did that without makeup clumping?! O_O )
Enough of my rambling. Here is what you SHOULD do =) this is pretty awesome you don't have to remove and redo all your makeup! Just spotlight touch-ups.
What you will need... is a wedged sponge, some facial moisturizer, and your foundation and your facial loose/setting powder if you use it, and the tool you use to put your foundation on (I usually use a brush and I'd like to use the same tool for the consistent look-- fingers give thicker application. But you can even use the same sponge =] )
Here are the steps (or how I do it at least lol):
1. Use one side of the sponge, very gently use dabbing motion to dab at your nose to remove the caked up foundation/powder.
2. Put a tiny bit of your facial moisturizer on the back of your hand, dab a little with the other side of your sponge, and wipe off your sponge on the back of your hand so the moisturizer is absorbed in the sponge
3. Gently dab the sponge (with moisturizer) on your nose (this will further remove the rest of the makeup, and at the same time re-condition your skin. The reason I don't just use the sponge with moisturizer to dab off the foundation is because it's just gross and less neat).
4. Do your usual application-- foundation powder or liquid foundation or whatever :) and set with powder.
Now your nose should look mattified like when you freshly finished doing your makeup in the morning :) cuz that's how mine looks like *wide smile*
Hopefully this is helpful to some of you :) Have an awesome day beautifuls!! =)
<3 Frances
Saturday, June 12, 2010
How to prevent makeup from smudging (6/19 Updated)
Hey everyone =)
So I think how to prevent makeup from smearing is a topic that will never cease XD Especially being Asian my skin type and eye shape really make my makeup prone to smearing than other races =T I have been wearing makeup consistently for the past like 3-4 years? Not that long compared to a lot of ppl I know XD
But here are my personal tips that have helped me... I know this will be a long article but please bear with me and I actually DO have different things to share than the general advice vids from other makeup gurus lol!!
I am going on focus on eye makeup smearing (eyeliner smudging/coming off and eyeshadow creasing) cuz that's my main issue and focus. I'm not that experienced when it comes to other parts of the face lol but I will put up some advice from other gurus =)
Few things to bear in mind when it comes to makeup-smearing:
1. Quality of makeup itself
- Go for waterproof stuff. Finding a good eyeliner is VERY important. It is kind of in vain to do all the work if the eyeliner itself sucks lol. Now eyeliner works differently for everyone so you will just need to try and find something that suits you best. I'd recommend Bobbi Brown, MAC fluidine blacktrack (**I'd stick with blacktrack when it comes to MAC cuz I found that their formula for different colors is very inconsistent... I have one in purple and it doesn't stay AT ALL**), Stila smudgepot and Buxom (for more info please refer to my eyeliner reviews)
2. Prepping your eyelids
- Find a good eye shadow primer that actually works for you. For example, everyone raves about Urban Decay Primer Potion... no offense there but that primer doesn't do crap for me, haha.
3. Things to avoid
basically things that would make your eyes water should be prevented... for examples....
- Avoid products that contain high SPF around your eyes (I'd say within 20 is safer). Having products that contain SPFs around your eyes/on your eyelids is likely to make your eyes water under bright light/sunlight.
- If your mascara flakes and falls into your eyes(especially those ones that are promoting length), you can prevent so/minimize it by applying an extra coat of clear lash gel.
- I'd say keep your waterline clear of anything if you don't want any smearing/eye-watering
- Liquid eyeliner always makes my eyes water!!! Especially when I'm outdoors in the sun (like I will be fine indoors lol isn't that weird) I have no idea why, maybe it's just the formula (setting with eye shadow doesn't help me. I've even tried putting on gel liner first then use liquid eyeliner over it... still made my eyes water 0_0 ). If you have the same problem, avoid liquid eyeliner on the outer corner of your eye, as well as the bottom line. Replace with gel liner to do the wing/cat-eye, as well as the bottom liner. Or you should just avoid liquid eyeliner like I do lol.
- If you like to mist your face (with MAC Fix+, Evian Spray, Vitamin E Spray what have you), avoid your eye area. Shield your eyes when you mist your face. I found that when I just close my eyes and mist my whole face, my eyes tend to get irritated.
4. Makeup Shelf Life
- Makeup has shelf life too lol. So if you've had your beloved eyeliner for a while and it hasn't been working great that means you need to get a new one :) Usually the shelf life of eyeliner is 6 months-12 months afer opening, you can check the container.
5. Most basically, start out with a fresh, clean face!
- "Painting" on a oily/dirty canvas is just not gonna work, so wash your face and moisturize thoroughly so your face doesn't get irritated later on lol. A comfortable face holds up makeup better
How I prevent my eyeliner from smudging
1. Foundation helps!
I don't know how many of you out there are like me who doesn't like to do full face application
I noticed when I use foundation all over my face, my makeup almost doesn't smear at all.
when I apply a very very thin layer of foundation around my eyes (thinner than your face application-- or else it'd crease on your folds!) I found that my eye makeup smears less.
***make sure the foundation is matte finish formula*** or at least set with face powder***
2. primer
- a good eye shadow primer not only prevents eye shadow from creasing, but it also helps eyeliner from smearing
- when applying, use just enough. I found when I apply a thick layer hoping for better results the effect is opposite.
3. Set eyeliner with eye shadow
That's what all makeup gurus say lol!
For me I like to put eyeshadow on first, then eyeliner (instead of the usual eyeliner, then set with eye shadow). This works a bit better for me. :P
(or you can even do primer- eye shadow- eyeliner- eye shadow again. I've done it before but it tends to make my eye really dry [because you're using the dry eye shadow to dry up the products twice if that makes sense]. Plus too many steps so I always got lazy to do it XD)
How to prevent eyeshadow from creasing
- find a good primer that works for you
-Urban Decay Primer Potion and MAC paintpot didn't do the trick for me: my eyeshadow still creases where my eyelid folds
a MAC artist told me to apply a layer of each and it helped her-- I haven't tried yet because I found the right primer :) (bareMinerals primer does the trick). So the important thing here is to find something that works for you
Face Liquid foundation
-Always wash your face before to get rid of residing oils on your face
-Properly moisturize and WAIT until products are absorbed
-Prime your face if it helps(personally don't feel a difference and primers tend to make me break out)
-Set with loose powder (makes the biggest difference!)
Blush
cream blush+ set with powder blush (personally never had a problem with blushes so I've never actually done this ^^)
Lips
- Use warm wet towel to gently rub your lips to get rid of dead/thick lip cells to prevent feathering
- moisturize and wait till products are absorbed
-line your lips
- apply lipstick and gloss
- use a similar eyeshadow to set (never tried this step but all the gurus said this makes your lip products stay forever lol)
In a very rought conclusion, the very basic principles for preventing makeup from smearing include...
1. Provide a clean, oil-free canvas for longer-lasting makeup application.
2. Set fluids/gels/creams with powder (to dry up the products)
WOW this was super duper long. But I hope it helps some of you :)
<3 Frances
Friday, April 23, 2010
Quick Hair Volume
Hey guys!
Since I was writing about my hair just thought I'd quickly share this quick easy tip with you guys, on how I achieve quick hair volume.
All you need is a big hair clip :) like shown in the picture
Basically I just grab the hair around my crown and LOOSELY clip them all up.
This is usually the first thing I do in the morning (it helps to have my hair up too while washing my face and doing makeup XD) and whenever I'm home (and convenient too... xD I don't like having my hair down cuz it'll be in my face) to make sure my hair is lifted.
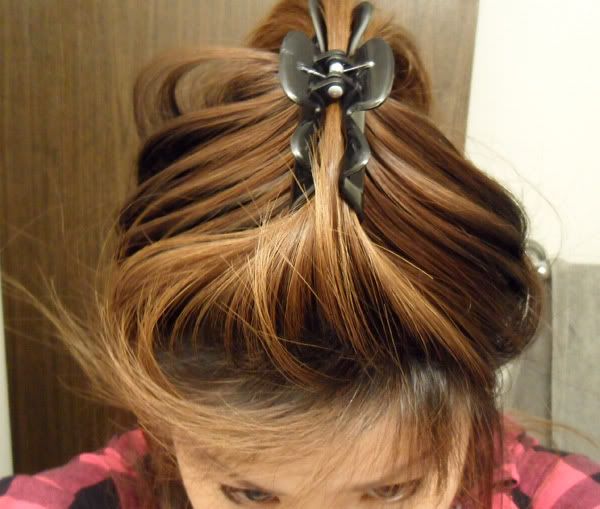
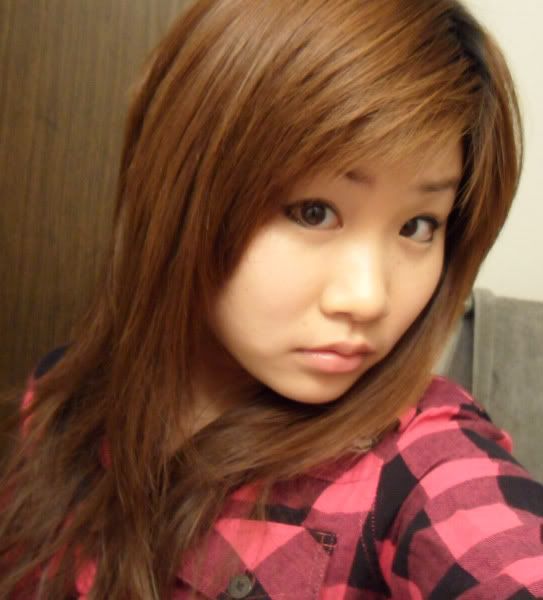
Like so. XD very sexy I know.
This pic is taken right after I put my hair down =) I should've posted a before pic. Oh well.
Feel free to put on some hairspray, I usually like to just leave it cuz I don't like wearing stuff in my hair lol!

Hope you guys have a lovely weekend :)
<3 Frances

Since I was writing about my hair just thought I'd quickly share this quick easy tip with you guys, on how I achieve quick hair volume.
All you need is a big hair clip :) like shown in the picture
Basically I just grab the hair around my crown and LOOSELY clip them all up.
This is usually the first thing I do in the morning (it helps to have my hair up too while washing my face and doing makeup XD) and whenever I'm home (and convenient too... xD I don't like having my hair down cuz it'll be in my face) to make sure my hair is lifted.

Like so. XD very sexy I know.
This pic is taken right after I put my hair down =) I should've posted a before pic. Oh well.
Feel free to put on some hairspray, I usually like to just leave it cuz I don't like wearing stuff in my hair lol!

Hope you guys have a lovely weekend :)
<3 Frances
Thursday, March 18, 2010
skincare do's and don'ts!
1. Avoid mineral oil on your skin. Mineral oil can clog your pores, causing breakouts and lead to blackheads. Mineral oils can be found in petrolatum and petroleum jelly (so try not to use vaseline on your face, but of course you can use it on your lips =] ). If you need something to seal your moisturizer, try olive oil.
2. If your skin is oily, be sure to thoroughly cleanse your face before you go to bed, so the oils and dirt trapped in the oils won't clog up your pores. However, NEVER STOP to moisturize your face! If you don't supply your skin with sufficient amount of moisture, your skin will respond by producing more oils.
3. Avoid fragranted moistures/skincare products. The fragrance might cause skin irritation.
4. Try to use natural skincare products, or use natural remedies. In my experiences, natual remedies work the best, even better than expensive skincare products.
5. When applying skincare products, use just enough of it, don't try to apply a thick layer on your skin. THE MORE IS NOT THE BETTER!!! What I mean by enough, is a comfortable amount of skin product that you actually feel your skin absorb everything, not leaving a layer of the product on your skin. Your skin cannot absorb everything if you apply too much, what's left over on the surface of your skin can lead to breakouts.
6. Drink lots of water!! of course =) Everyone knows why. It'll not only help hydrate you, balance the electrolytes, but also flush out the toxins!
7. Avoid sugary food, chocolate, junk food, and fried food. Blackheads are inevitable, but you will be AMAZED by how much your blackheads improve once you changed your diet.
8. When apply natural remedies, make sure you rinse off your face thoroughly. Natural remedies should never cause your skin to break out, unless there are residues remaining on your skin. ***** ALWAYS CLEANSE YOUR FACE if you want to avoid breakouts!!! Cleansing, in my opinion, is the most important step for good skin care regime*****
9. Always switch up the skincare products, don't just stick with one. I used to use this one line of skin care products from Clinique for 3 straight years because I have very sensitive skin and was suffering allergies then, and Clinique was the one that worked for me, so I just stuck to it. Then after 3 years one day my skin just wouldn't absorb the moisturizer, at all =( like I could literally feel a layer of moisturizer sitting on top of my face, but underneath my skin just feels really tight and dry. What happened is that my skin got so used to the products, it stopped responding to the active ingredients in the moisturizers. So always switch up your products to constantly stimulate your skin =)
10. Is your skin or neck feeling irritated for no reason? (i.e, you haven't changed your skincare routines or didn't do anything different). Try watching out for your hair products. Did you use a new leave-in conditioner? You might be allergic! (I'm allergic to aloe and I once used a leave-in conditioner containing aloe without being aware of it, I started breaking out. I checked the ingrediants and stopped using it. My skin was back to normal in no time). Clay, hair sprays can also irritate your skin. So next time your skin breakouts coincide with change of haircare routine, the hair product is probably the culprit behind all that!
11. Avoid oinments for areas that suffer from rashes. Try cream formula instead. I don't know exactly the reason behind it... just something I discovered.
12. If your skin just feels really really dry and it's like no amount of moisturizer you apply would help... it probably means you're really dehydrated. Drink water!
13. Sleep is when your body repairs itself, so get enough sleep! And getting plenty of sleep is not enough, more importantly, sleep at the RIGHT time. 11pm-2am is when your liver detoxifies, a very important process that takes place in your body, so you want to make sure you're resting while your liver does that, lightening the workload for your liver.
14. Take multiple vitamins regularly. Your body needs all sources of nutrients, vitamins and minerals to maintain its integrity and health, so does your skin, especially when your skin is always turning over and trying to recover from some kind of damages, like free radicals, radiation. ****** It is important to pay attention that your supplements come from a brand that is USP verified-- meaning that the contents are verified not to contain anything harmful/inpurities. Believe it or not, supplements are the only kind of "food" that is not regulated by FDA. If you read carefully, the bottles of supplements usually have this disclaimer: "These statements have not been evaluated by the Food and Drug Administration. This product is not intended to diagnose, treat, cure or prevent any disease." Basically, whatever it "claims" to do on the bottle, they don't need any evidence to back it up, and FDA can only intervene when there is undo harm, like liver damages or death. So be careful when you choose your supplements! ****** PS. In case you're wondering how I know... I learned all this info from my nutrition class, so I'm not just BSing :) Also, when you take your supplements, take it with a meal so they're more bioavailable (meaning more readily available to be digested, absorbed and utilized by your body).
15. When your skin is injured for some reason, like from squeezing your pimple etc., avoid wearing makeup on top of it, because the pigments in your foundation/concealor will settle into the wounds, leaving your wound darkened and will be prone to leave scar marks. I've got scars from wearing concealers before T_T
So as you can see... a lot of the advice is not about taking care of the skin... it's about taking good care of yourself. If you take good care of yourself, naturally, your skin is gonna reflect that =)
Take care!
<3 Frances
Wednesday, March 10, 2010
Different ways to apply blushes
Hello hello!
So I went ahead and collected a few different looks of how you can apply your blush.
Let's start :)
1.
This is the most common way to apply blush. Simply apply the blush on the apples of your cheeks. This application is suitable for all blush colors.
Dab or apply in a circular motion to achieve this look.
2.
Apply the blush on your cheek bone. This will emphasize your cheek and give you a more defined, angular face shape. Any color would work for this application too.
3.

This is quite an unusual application? Probably not for daily look lol. But I thought it is a pretty cool look. The blush here also serves the purpose of contouring/shading the face. I noticed this look is very similar to MAC's newest look: Too Fabulous (can check it out at maccosmetics.com), except that in MAC ones, they blend the blush up to the temples as well :) (I think purple blush works great for this kind of look... I tried it at the store and totally wasn't something I expected. If you don't apply too much blush it's actually very wearable. I tried the look with Blush Ombre, Vintage Grape).
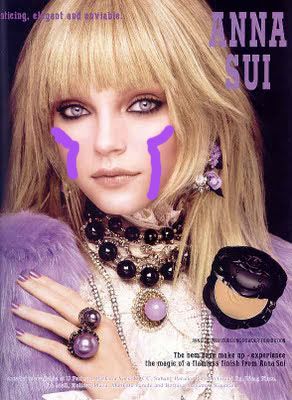
4.

I love love love this look! :D You apply the blush on the apples of your cheek, but in a triangular shape. By doing this you also achieve the contouring effect. I think this look works best with bronze blush.

5.
This kind of application gives you a facelift and slimming effect :) Start off with the apples of your cheeks then sweep up and outwards.
PS: This is a Japanese model from Popteen magazine. Her name is Nana Suzuki (鈴木奈々) in case you're wondering :)
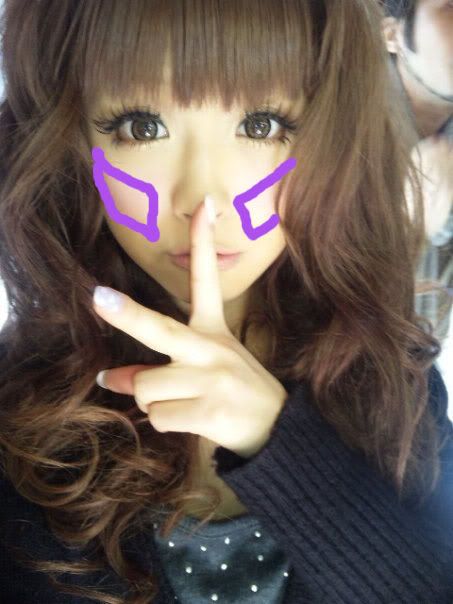
6.

This is very similar to the first one, except the blush is applied more closely to the nose, like more to the center, instead of on the side of the apples of your cheeks. Does that make sense?!?!? lol!
This application gives you a cute and young look :) So I think using pink or coral colors would be the best.

(This is another Japanese model from Popteen magazine. Her name is Funayama Kumiko, 舟山久美子)
************************** I DO NOT OWN THESE IMAGES*******************************
I hope you guys found this helpful! :) Again thanks for reading, and have a lovely week!
<3 Frances
So I went ahead and collected a few different looks of how you can apply your blush.
Let's start :)
1.

This is the most common way to apply blush. Simply apply the blush on the apples of your cheeks. This application is suitable for all blush colors.

Dab or apply in a circular motion to achieve this look.
2.

Apply the blush on your cheek bone. This will emphasize your cheek and give you a more defined, angular face shape. Any color would work for this application too.

3.

This is quite an unusual application? Probably not for daily look lol. But I thought it is a pretty cool look. The blush here also serves the purpose of contouring/shading the face. I noticed this look is very similar to MAC's newest look: Too Fabulous (can check it out at maccosmetics.com), except that in MAC ones, they blend the blush up to the temples as well :) (I think purple blush works great for this kind of look... I tried it at the store and totally wasn't something I expected. If you don't apply too much blush it's actually very wearable. I tried the look with Blush Ombre, Vintage Grape).

4.

I love love love this look! :D You apply the blush on the apples of your cheek, but in a triangular shape. By doing this you also achieve the contouring effect. I think this look works best with bronze blush.

5.

This kind of application gives you a facelift and slimming effect :) Start off with the apples of your cheeks then sweep up and outwards.

PS: This is a Japanese model from Popteen magazine. Her name is Nana Suzuki (鈴木奈々) in case you're wondering :)
6.

This is very similar to the first one, except the blush is applied more closely to the nose, like more to the center, instead of on the side of the apples of your cheeks. Does that make sense?!?!? lol!
This application gives you a cute and young look :) So I think using pink or coral colors would be the best.

(This is another Japanese model from Popteen magazine. Her name is Funayama Kumiko, 舟山久美子)
************************** I DO NOT OWN THESE IMAGES*******************************
I hope you guys found this helpful! :) Again thanks for reading, and have a lovely week!
<3 Frances
Sunday, March 7, 2010
Get Glowy Skin :)

Hey guys!
So this is a really quick way to help your skin appear radiant and healthy!
All you need is a good highlighter/luminizer/illuminator :)
Few examples: YSL Radiant Touch, MAC Mineralize Skin Finish, Benefit High Beam,Too Faced Absolutely Invisible Candlelight Powder.
Now, I haven't used all of the ones I listed, I've only tried them, but I don't own all of them.
The ones I do own are Benefit High Beam and MAC MSF.


Out of the two, I prefer MAC MSF. The reason being... I think when it comes to highlighter, it's best to use powder rather than liquid, cuz the liquid formula can ruin your makeup. At least for me, the benefit high beam totally sabotages my makeup when I wear mineral foundation.
I really do recommend MAC MSF... the effect is immediate, it is so sheer and sheen and gives you a beautiful glow, I love it =)
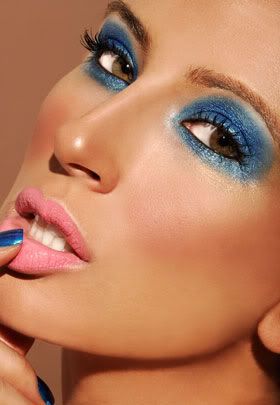
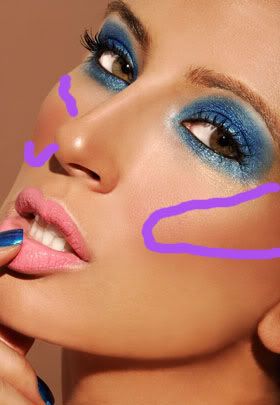
Here's a map of where you should highlight your skin:

I know, hahahah. The pink part is where you should highlight if you want glowy skin... on your cheek bones, and down the middle of your nose. The blue parts are just extra parts you can highlight to make your features stand out (in case you can't understand my map, it's the top of your brows, under your brow bone/arch of your brow, and your cupid's bow). For the blue parts it's perfectly fine to use your eyeshadow to do the job, for the pink parts I won 't recommend doing so... I've tried and it didn't work that well XD unless if your eyeshadow is super sheer and has a nice sheen.
That's it! I know it's very basic, but it's really nice and handy =)
Thanks for reading, xoxo
<3 Frances
Thursday, March 4, 2010
Makeup brushes too scratchy?
Hello =)
So I'm not sure if some of you have had this experience before...
Sometimes when you use your eyeshadow brush, it just feels too rough and scratches your eyelid and really hurts?
That happened to me before and also happened to my friends who I was applying makeup on, so I'm pretty sure it's not me being overly sensitive, it's the quality of the brush. And the brushes in question are actually not some of the cheap brushes either-- they're my MAC 219 pencil brush and 217 blending brush =( which is very frustrating considering the amount of money I paid for them, the quality should be so much better (even my StudioTools and Sonia Kashuk brushes are softer and they're 1/3 of the price).
Anyways, I found a little trick that helped =D
All you need is a nail file lol! And make sure it's the rougher kind (you can even use a sand paper if you wish). And you just take your brush and brush it back and forth on the nail file. Brush your lid to see if it's still rough/where it is rough, and just keep doing it until the scratchy bristles are filed off =) Don't forget to wash your brush after you're done!
I'd like to say don't worry if this is gonna ruin your brush... because my brushes still perform the way they are, and my 219 actually hasn't bothered me anymore =) 217 sometimes still scratch a little but it's definitely softer now.
Hope this trick helps some of you =)
<3 Frances
Subscribe to:
Posts (Atom)