
Hi there! :D
So I'm sure a lot of ppl have heard of Ulzzang makeup... but what exactly is it?
Here's Wikipedia definition for you XD haha good ol' Wiki!!!
"Ulzzang is a popular South Korean term literally meaning, 'best face,' or 'good-looking.'
(Funnily I always thought it's a Japanese term... I always thought it's the same thing as Gyaru. Does anyone know the difference??????)
Characteristics:
All Ulzzangs share similar features such as big eyes " the main focus" or concept of the look(as in doll eyes with long eye lashes and cute anime characteristics), small nose, fair skin, etc. Circle lenses are known to be popular with most ulzzang.
This is such a Japanese definition!!! To me at least, I wonder if this trend started in Korea and is made big in Japan???? Or is it just a mistake on Wiki???? I'm very curious.
Anyways off the topic. Here we go! :)
This look is all about eyelashes, so prepare a pair of upper lashes and bottom lashes =)
For upper lashes I'm using these from Sephora.

Sorry if they look battered... I've had these for SOOO long that I'm amazed they still work!
For bottom lashes I'm using MAC 39.

For some reason those lashes aren't listed on the MAC website, and they weren't on display at my local MAC store. I had to ask them if they carry any bottom lashes and they unraveled these babies for me =D

they're supposed to be longer... those are already trimmed down. I trimmed the hairs so the look is more wearable =)
The trick to trimming eyelashes is... patience!!!! It's like cutting your bangs... you fix it piece by piece...hair by hair. When you cut your hair you don't just grab a big chunk and cut them all at once; eyelashes are the same =) My advice would be to hold your scissors vertically (just like how you would with your bangs!) and cut the lashes hair by hair. Be patient and don't rush!!! I'd also recommend practicing on some cheap/unwanted lashes before you go to the real thing.
The other key component to this look would be rimming your waterline with white pencil (I used "Fascinating from MAC Eye Khol). This really brightens up your eyes and makes your eyes bigger!
Eyeliner-wise, here's a map of how I did mine (please excuse my drawing XD)

For this look it's all about emphasizing the innocent, puppy-eye look, so be sure to drag your eyeliner all the way to the corner of your eye to pull down your eye shape, if that makes sense?
I will write more about eyeliner later =)
And after I applied my lower lashes, I took my eyeliner and very lightly go under the falsies to darken the outer corner a little bit, to add more depth and dimension =)
As for eye shadow... I didn't wear much as you can see... I just applied "White Rabbit" from Urban Decay's Alice In Wonderland palette all over my lid and put some greys on the outer corner. You can see in this look eyeshadow doesn't really matter because you can't really see it anyways through your fake lashes. But I do recommend using white, shimmery eyeshadow to really brighten up the eyes ;)
... Don't forget to define your eyebrows too!
And that's really it! Really simple huh?
The products I used for the rest of my face... MAKE UP FOREVER HD Foundation in #115 (this foundation is slightly paler than my skin tone... but this look does work better on paler complexion. Just don't forget to apply some on your neck too if the color difference is too much). Translucent Loose Powder in 06 from Estelle Lauder. But really... any setting powder/loose powder you own will do =) NARS "orgasm" for blush, and Dior lipstick in #355 (not sure if they still have it, but any rosy pink will work).
I hope this helps someone in some way! Good luck =)
PS: If you have color /circle lenses, go ahead and pop them in =) I'm not wearing any cuz I don't know how T__T I've tried soo many times but my eyes just won't budge!!! Aghh!!
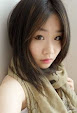
More pictures:


you can see the eyes better in this pic lol

Posing contributes a lot to the Ulzzang look too :P supposedly the innocent look... *vomits*

I photoshopped this pic... adjusted the exposure and other things a little. You can see how the white eyeliner really makes your eyes stand out.
Thanks for reading again and have a wonderful day!!!
<3 Frances
Hi gorgeous!
ReplyDeleteThis is an awesome blog! I love the look---love the tutorial :)
must try on myself XD (without the lashes...Orz)
P.S. I got the same eyelid primer as you did XD freaky coincidence? I THINK...that's the only one Sephora has. hahahahahah XD
Thanks hunni >__< I heart you!!!!! You're like the first friend to support me here >_<
ReplyDeletehaha yes freaky coincidence indeed! how come I didn't know you have it while I was there? But I'm surprised they didn't recommend Urban Decay Primer Potion to you at Sephora cuz that's what they all do whenever I asked for primer O_o nevertheless great choice... cuz I prefer it over UDPP xP great minds think alike *nodds*
Hi gorgeous!
ReplyDeleteThis is an awesome blog! I love the look---love the tutorial :)
must try on myself XD (without the lashes...Orz)
P.S. I got the same eyelid primer as you did XD freaky coincidence? I THINK...that's the only one Sephora has. hahahahahah XD